Tag Archive for: Google Analytics

Adding Google Analytics tracking to WordPress via a plugin

Before we start you will need a Google Analytics account.  See our other guide for setting up a Google Analytics account.

There are many Plugins that add Google Analytics to a WordPress site. Some will add Google Analytics reports into your WordPress site admin interface and other will just push your site’s data to Google Analytics meaning you have to view it on the Google Analytics website.

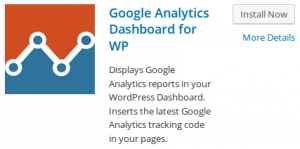
For this post we are installing Google Analytics Dashboard for WP.  As with any Plugin you need to consider security.  Look for Plugin’s that have had lots of downloads and good reviews and also that have been updated within the last 6 months. Plugin are made by anyone with programming skills and like most things people lose interest or run out of time to keep their made plugin secure and updated.  An insecure plugin could be the way hackers get into your website and cause issues.

To install Google Analytics Dashboard for WordPress:

  1. Log into your WordPress site (www.example.co.uk/wp-admin)
  2. On the left hand side go to Plugins and click Add New.
  3. Search Plugins in the right hand corner of the page for ‘Google Analytics Dashboard for WP‘ and click Install Now.Google Analytics Dashboard for WP
  4. On the install page click Activate Plugin – you will now see Google Analytics on your left hand menu
  5. Select Google Analytics – General Settings and click Authorise Plugin
  6. Click the red link (Get Access Code) on this page to generate and get your access code. A new window will pop-up asking you to allow specific data from your Google Analytics account to be used by Google Analytics Dashboard for WP. After agreement, an access code will be provided.
  7. Copy the code, paste it in the field called Access Code and save it by pressing the Save Access Code button.
  8. Once set up please be aware it may take up to 24 hour for data to appear in your reports.

You are now set to explore and set up Google Analytics Dashboard for WP as you wish. For more information and a more in depth video on how it works please visit the Google Analytics Dashboard for WP Documentation, Tutorials and FAQ page.


How to set up Google Analytics for your website

There are three parts to setting up Google Analytics to start collecting basic data from your website.

  1. Create a Google account or activate (access) Google Analytics on your existing google account
  2. Set up a property in your google account.
  3. Follow the instructions to set up web tracking

Only you as the website owner can set this up as it comes under your personal google account so your web host or developer will not be able to set this up for you. However it is very easy to do and a simple guide is below:

Create a Google account or activate (access) Google Analytics on your existing google account

First you will need to create a Google Analytics account. To do this, visit Google Analytics Signup Page.

If you already have a Gmail/Google account, then use that to sign-in with. If you do not have a Gmail/Google account, then you will have to create an account for yourself.

If during the sign in/up process you end up on the wrong page just visit https://analytics.google.com/ to get you back on the right page.

Set up a property in your google account

Once signed into your Google Analytics go to the ADMIN tab along the top of the page

In the ACCOUNT column, use the dropdown menu to select the account to which you want to add the property.
In the PROPERTY column, select Create new property from the dropdown menu and select website.

Tips for completing the form

Website Name: you can simply use your URL if you wish.

Website URL: just type in your website address! Select the protocol standard (http:// or https://). Enter the domain name, without any characters following the name, including a trailing slash (www.example.com, not www.example.com/).

Industry Category:  this is optional and can be left blank if you struggle to find an appropriate category for your business.

Reporting Time Zone: Pick your time zone. This is key for making sure the way Google Analytics counts days lines up with your own business day.

Data Sharing Settings (if shown): completely optional. Select and deselect as you feel comfortable.

Click the blue Get Tracking ID button. Your property is created after you click this button, but you must set up the tracking code to collect data.

Follow the instructions to set up web tracking

There are several ways to collect data in Analytics, depending on what you want to track. This Set up Analytics tracking guide gives you the instruction on the best installation method for what you wish to track.

If you are using WordPress please refer to our Google Analytics for WordPress post.

Whatever method you use to set up Google Analytic please be aware it may take up to 24 hour for data to appear in your reports.